Project: Replace the old worn out receptacle in the bathroom with a new CFGI outlet.
Whatever we plugged into the outlet didn’t stay in the outlet and that is both annoying and dangerous. This project had been nagging at me every time I entered the bathroom and I finally had enough. I figured it would take about an hour to do. It took much longer than an hour but it is finally done.
Tools used:
- Reciprocating saw
- Phillips screwdriver
- Battery operated drill/screwdriver set to low torque
- Non-contact voltage tester
- Wire cutter and stripper
Supplies used
- GFCI Receptacle
- Electrical tape
- Plastic electrical box
I didn’t track exactly how long it took to complete the project but it was several hours due to two trips to the store, having to widen the hole in the wall and the fact that I am not a professional in these things.
I tested the tester to be sure it worked, turned off the power at the breaker, then tested the wires to be sure there was no power to them. I got seriously shocked a few years ago and barely escaped electrocution when I did something really dumb. I have no desire to repeat that experience or to give account to God for my time just yet.
I went to the store and picked up a good quality CFGI receptacle that was rated for a wet environment.
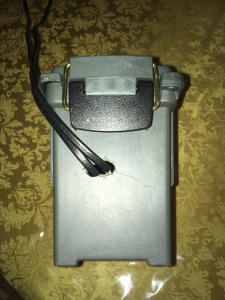
Once I was certain there was no power to the outlet I removed it from the wall and cut the wires. There was no electrical box covering the outlet so I had to go back to the store to get one.

The black wire is supposed to be the hot wire. Based on what I have seen while installing other outlets in the house I figured that this one might be wired wrong so I tested it. Sure enough, the white wire was the hot wire. The ground wire was also connected to the outlet when there is no ground on this old electrical system. That is dangerous as you could end up being the ground. I verified that the ground was not grounded before I removed the old outlet by using a receptacle tester. The tested showed an open ground.
This kind of sloppiness is one reason I like to do all of the work I can myself. Unprofessionalism in home construction and remodeling is rampant. From my experience, it is more the norm than the exception. Doing repairs and remodeling myself I can use higher quality parts and know it is done correctly.

I put a piece of tape on the hot wire and labeled it accordingly. Yes, black tape is what I should have used but I didn’t have any black electrical tape at the time. I bent the ground wire back and thoroughly taped it to the insulated wire well away from the other two exposed wires. I would have cut it off but plan to rewire the entire house as soon as I can get to the project.
The back of the receptacle has the spots where the wires are supposed to go clearly labeled. There is also a handy label on the back that shows how much to strip the wire. Look on other websites as to what these mean. This site is not about giving advice on electrical wiring as I am not a professional.
The most time-consuming part of the job was cutting the hole wider to fit the box. The hole was about 1/4 inch too narrow. Despite being as careful as I could I knocked some of the plaster off of the wall. I’ll make a patch for it at a future date.
I started to use the holes in the back of the receptacle to connect the wires instead of the screws but one of the wires fell out so I used the more secure screws.
Once the wires were attached it was simply a matter of carefully stuffing the wires and the receptacle into the box, screwing everything down and testing the results.
That is one more thing checked off the list and one more piece of the ancient wiring that is updated and a little safer.